It isn’t sewing, but it is craft. And I could write a thesis on why mosaics and sewing are similar. They both take basic raw elements, cut them into suitable shapes then put them all together in a (hopefully) artistic, appealing, expressive way. And (hopefully!) all the technical choices of thread, grout etc ares the right kind for the project so it all stays put and doesn’t fall apart, taking your hard work with it.
It is also addictive. I could easily have a stash of tesserae right up there alongside my stash of fabric and sewing patterns. I need more storage space!!!
And, sad but true, you can be left at the end of the either a sewing or mosaic project going “How beautiful. But, er, what do I do with it now?”
How I did it all:
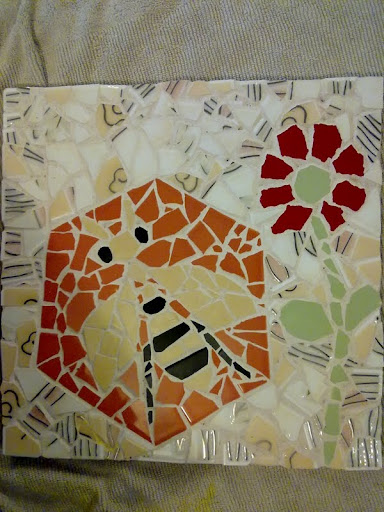
A friend of a friend (fof) started teaching my friend and I mosaics. (heh, good sentence huh? makes sense?) by getting us to draw an outline of our motif on a tile. My tile is about 30cm square, an old terracotta one the fof had in her er, mosaic stash? I chose a bee and a flower.
Next we chose tiles in the colours we wanted, then smashed them up inside an old hand towel (to protect the tiles and the pavers we were smashing them on). This bit was inordinately FUN 😀
Then we arranged them into the chosen motif. Where necessary we snipped the tiles a bit to shape with tile cutters, though Fof seemed to think that was cheating a bit. She is a real fan of using the fragments of tiles as they broke, searching to find just the right one. All the bee tiles were found as is, and to be fair to fof, it was surprising how easy it was to find pieces in just the right shape. I only snipped the flower petals and leaves a bit.
Once we had the pieces all laid out, we glued each one down. The glue was like a sandy cement.
Here is the basic motif in place on the tile. You can see the motif drawn on the tile too, and how I took Artistic License to make the tile pieces work together to form the motif.
 .
.
After a year of it sitting round like this, and fof long moved onto another craft (cutting gemstones!) I realised the reason I’d baulked was the glueing. First placing everything on the tile in the right place – that was ok. But to then have to fiddle around with smelly glue (I have sinuses that strenuously object to that sort of thing 😦 picking each individual I conceived of another way.
I laid out the tesserae as desired, then covered them with contact. You know, that sticky plastic used to cover school books and stuff? I used clear contact so I could see what I was doing better. Then I’d lift the up the contact and the tesserae stuck to it, glue the underneath of the tesserae then stick it all back down and leave it to dry. Sadly because the glue was a drying style glue, not a chemical reaction style of glue, the contact made it take a looong time for it to all dry. But overall it worked! And much less frustrating than gluing each individual tessera down.
I did the contact/glueing bit in segments. You can see at the top-centre a segment of bare tile still to go. The shiny bit at the bottom of the picture is the light reflecting off the contact.

After it was glued, the glue firmly dried and I’d cleaned the excess glue up, I had to grout it. I sat on this one for months, I swear. I really needed a teacher, but fof was so happily into her gemstone cutting (sooo beautiful!) I kept forgetting to ask her for help each time I saw her. I confess, I just went into instant Admiration Mode over her gemstones, then upon returning home realise I’d forgotten yet again to ask her. Gah!
In the end I did extensive consultations with the googorical, AND found a ready-mixed grout at the hardware shop. These two things gave me enough confidence to give grouting a go, and I FINALLY produced this…

For the record, the black bits on the background are actually a reflective silver. Very very pretty, and works very well with the subject matter. Just don’t photograph too accurately 😦 I’ve since completed two more mosaics, and I still can’t get over the way they look so different, so finished and soooooooo much better with the grout done. It is magical. I love it!
It sat around for months, as I contemplated what on earth to do with it. We have enough heat trivets etc in the kitchen, which was the obvious use for it. We certainly didn’t need another one. In the end I’ve kinda settled on it being on the coffee table, for putting hot drinks etc on it. Works fantastically well. I DO have to seal it before any of said hot drinks spills accidentally and stains my lovely grout though!
Things I have learnt about mosaics from my first project (in no particular order):
- Grout is like cake icing. Applying grout is like applying icing, it needs to be a similar consistency and it behaves in a similar way.
- Tile glue powder behaves in a similar way to icing sugar too. A little bit of water goes a looooong way.
- Finished mosaics are HEAVY O_O Definitely of the permanent fixture kind of creation, not the cart around and move on a whim kind.
- Mosaics are a wonderful medium for exploring shape, colour, texture and the all-important design element of negative space.


It turned out well, very attractive. The weight though, certainly limits the use of the finished item.
LikeLike
Thankyou!
Yes, I’d love to do one for Donna and send it to her but could you imagine the freight charge?
LikeLike